Organizing your leaning space at once can be a big task, but it’s much easier if you tackle it by working on one area at a time. Involve the children so they feel ownership of the space. A clean and organized learning environment helps children feel more relaxed and ready to learn!
A Place for Everything
If you are working with a large group of children, divide them into smaller groups and let each group 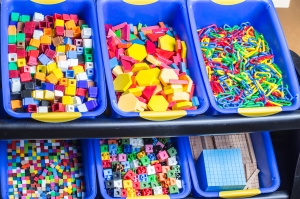 organize one learning area. With smaller groups, everyone can work together to organize one area at a time. Sit in the space with the children and discuss any problems they have encountered using the materials. Are any materials hard to find? Are some things hard to reach? Do some of the materials tend to get mixed together? Work together to create a plan for organizing the materials in the space. Once the materials are in place, make labels to help everyone remember where each material belongs. Let the children help with creating the labels. They can take photos of the materials, cut pictures from catalogs, or make drawings. Laminate the pictures or cover them with clear contact paper. Attach them to the bins or shelves where the materials belong. Now when the children clean up, it will be easy to see where each material belongs.
Contain the Mess
Be on the lookout for large plastic trays with rims. You may see them at discount or dollar stores. These are great to use for playdough, clay, or messy art projects—especially those with glitter! They are also helpful for children who have trouble identifying their own space and materials. Each child’s materials can be kept on an individual tray so there is less conflict and the mess is easy to clean up. An old shower curtain under the work area is also great for catching drips and spills.
Marker Organizer
Marker lids have a way of rolling off the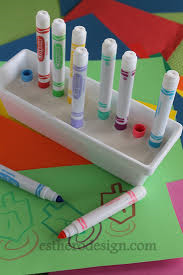 table and disappearing! Here’s a little trick that many teachers and caregivers have found useful. Mix up some plaster of paris, following the package directions. Spread the plaster in a shallow container. Before it dries, insert markers, cap-side down, in the plaster so that they stand up straight. (Be sure the plaster does not completely cover the lids.) When the plaster is hard, the children can pull the markers out, but the caps stay in place. When the children finish, they can easily stand the markers in the caps.
Crayon Marks
Baking soda is a safe material for children to use to clean up stray crayon marks. Place some baking soda in a shaker. Show the children how to shake the soda onto the marks and rub them with a damp sponge. Voilà! No more crayon marks! You may be surprised how much the children enjoy doing this!
If you have other tips that work well in your room, please post!
Back to blog listing